
How to Create a Custom GPT
The world of Artificial Intelligence (AI) has made major progress over the past year. This time last year, in January 2023, ChatGPT 3 was relatively unknown in the public sphere and very few people had started experimenting with Open AI’s language model. Over the course of 2023, just from Open AI, we saw the launch of ChatGPT 4, ChatGPT 4 Turbo, assistants API, and custom GPTs. Various other AI tools have come to market from other tech companies, but this post will focus on custom GPTs, how to create them, and what they mean for the business world.
According to Open AI, custom GPTs allow you to “…create custom version of ChatGPT that combine instructions, extra knowledge, and any combination of skills.” The novelty of this release is that no coding is required for the end user to create custom GPTs. The business applications for custom GPTs are vast, and much of the opportunity with them is yet to be discovered, but they will come to the surface over the course of 2024.
Table of Contents
Why Opt for Custom GPTs?
Some might ask, “Why opt for custom GPTs when I can just use regular ChatGPT?” – because you can custom tailor ChatGPT for specialized tasks that normal ChatGPT would not be able to perform. This is done by creating a unique knowledge base for your GPT. The knowledge base for custom GPTs can hold up to 20 files and 3,000 pages of content, significantly more context than regular ChatGPT can reference. Having the ability to have an expanded context for the GPT to reference gives them the power to be tailored to your specific needs.
The benefits of custom GPTs in various industries are vast and still being realized. However, the businesses that start experimenting with them now will be far ahead of their competitors, who ignore the potential of creating custom GPTs. Well-crafted GPTs can solve problems and provide value to your business’s customers and internal teams.
Let’s explore creating a custom GPT with real-world applications that provide value to you, your business, and your customers.
Inspiration for Your Custom GPT
The first step in creating your own GPT is brainstorming unique ideas for your GPT. There are a few ways to go about this, but here are some good questions to ask yourself to start the brainstorming process:
- What am I currently using ChatGPT for?
- What am I using ChatGPT for that I could get better outputs if ChatGPT had more context to reference?
- What processes and workflows do I spend the most time on right now?
- Do I want to create a GPT that only I will use, only people at that business will use, or one that anyone in the world could use?
Answering these high-level questions will give you a pretty good idea of what type of GPT to create. Let’s run through a hypothetical scenario and address these questions.
- What am I currently using ChatGPT for?
- Answer: Brainstorming ideas for content writing, creating content outlines, and helping with the editing process for content writing.
- What am I using ChatGPT for that I could get better outputs if ChatGPT had more context to reference?
- Answer: If I could provide more contextual references on writing best practices, writing samples, and what my overall goals are with content writing, then I would get better outputs from ChatGPT.
- What processes and workflows do I spend the most time on right now?
- Answer: Research for content writing, determining the best outline for content, and getting the first few words for each section written,
- Do I want to create a GPT that only I will use, only people at that business will use, or one that anyone in the world could use?
- Answer: I want to create something that I can use for myself first, iterate on, and then if I find it’s useful, then I can share it with people at my company so they can also benefit from it and perhaps provide suggestions on how to make it better.
Now that we have answered our questions, we have much more guidance on the type of GPT we should create. From our answers, it’s clear that a custom GPT to help with the content-writing process will be really helpful, so let’s dive into the specifics of the process.
Creating GPTs Step by Step
You will need a ChatGPT subscription to create your own GPT, so if you don’t already have one, this is step one.
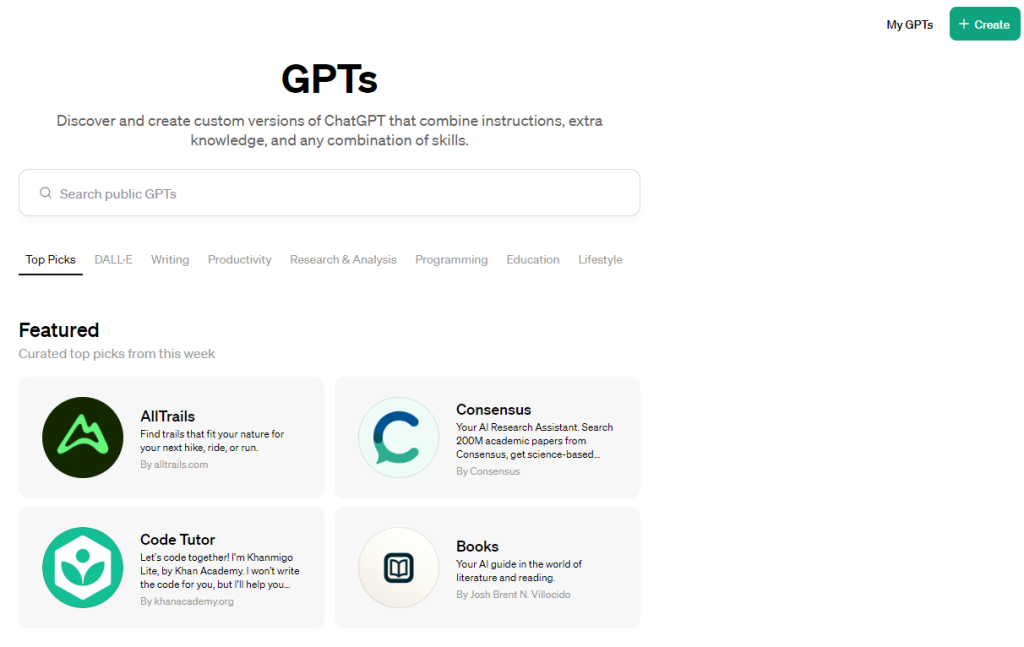
Once you have your ChatGPT subscription, click “Explore GPTs” in the upper left corner.

Next, click “Create” in the top right corner.
On the left side of the screen, you can configure your GPT in the manner you would like. The right side of the screen will allow you to preview how the GPT responds in real time.
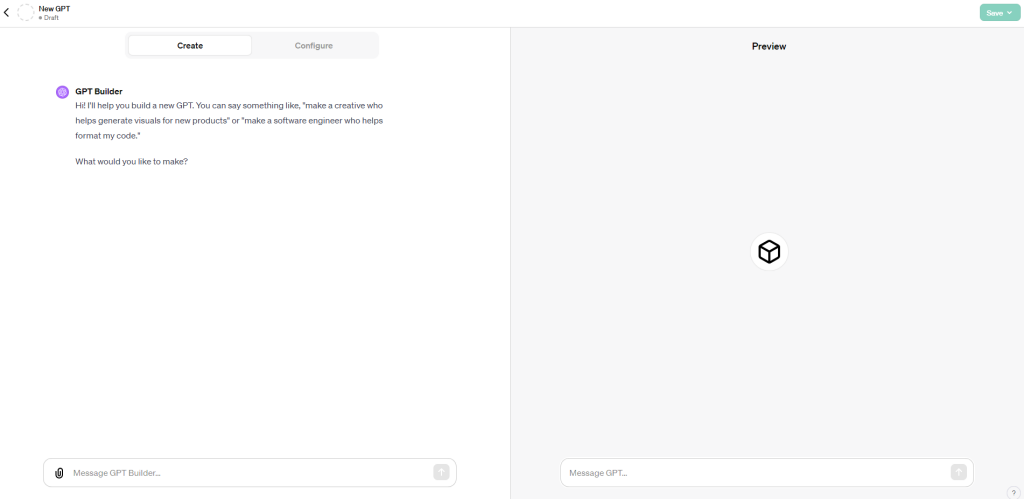
For this next part, you have two options that you can pursue. You can prompt the GPT builder to tell it what you would like, or you can toggle to the “Configure” section for more input on what you want to create. If you are building something super simple that doesn’t require a custom knowledge base, just prompting the GPT Builder could suffice.
The conversation flow will be pretty intuitive if you stay in the “Create” section and prompt the GPT Builder. You can start in the “Create” section and then fine-tune your GPT in the “Configure” section.
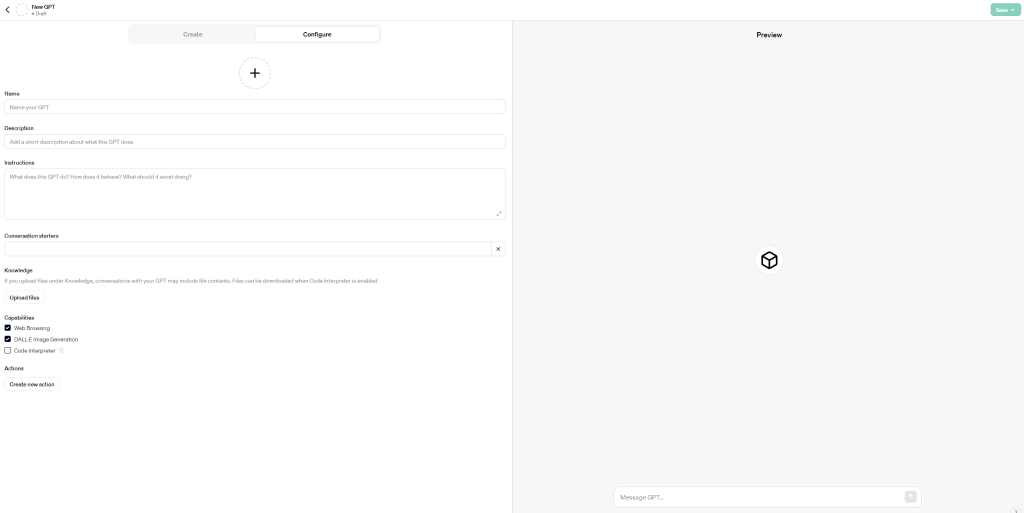
Now, let’s do a walkthrough of how to navigate and input the “Configure” section of the GPT Builder.
You will complete the following steps:
- Name your GPT
- Add an image for the GPT by clicking on the “+” and it will give you the option to upload an image or have DALL-E generate one.
- Add a short description of what the GPT does.
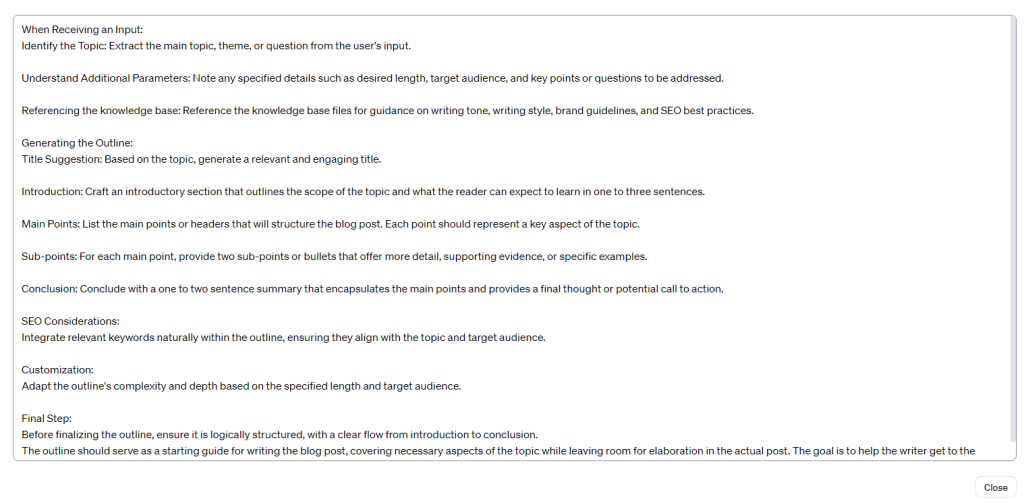
- Provide instructions on what the GPT does, how it behaves, and what it should avoid doing.
- This is the start of you providing the GPT context that it will reference for every prompt it receives.
- You can add conversation starters if you would like, but it won’t be necessary for some GPTs
- Upload files under the “Knowledge” section – this is your GPT knowledge base that it can reference. This is where the ability for the GPT to have an expanded context limit really comes into play.
- You want to be sure only to add relevant information to your GPT to get accurate responses.
- Select the capabilities that you want your GPT to have. The options here are:
- Web Browsing: Enables the GPT to browse the internet using Bing. This can be a double-edged sword because it can reference any opinion on the internet, which is full of misinformation.
- DALL-E Image Generation: Gives the GPT the ability to create images. Don’t select this capability if you do not want your GPT to create images. It’s also important to consider that AI image generation, at this point, is very imaginative and shouldn’t be used for scientific purposes.
- Code Interpreter: Allows greater computational accuracy when coding or mathematics are involved in a GPT process. If you plan to do either, you should select this capability; if not, leave it off.
Figuring out which capabilities you need should be relatively easy based on what type of GPT you are creating. In our hypothetical case of creating a custom GPT to assist with content outline creation, we will enable “Web Browsing.”
See below for an example of what a filled-out configuration section looks like:
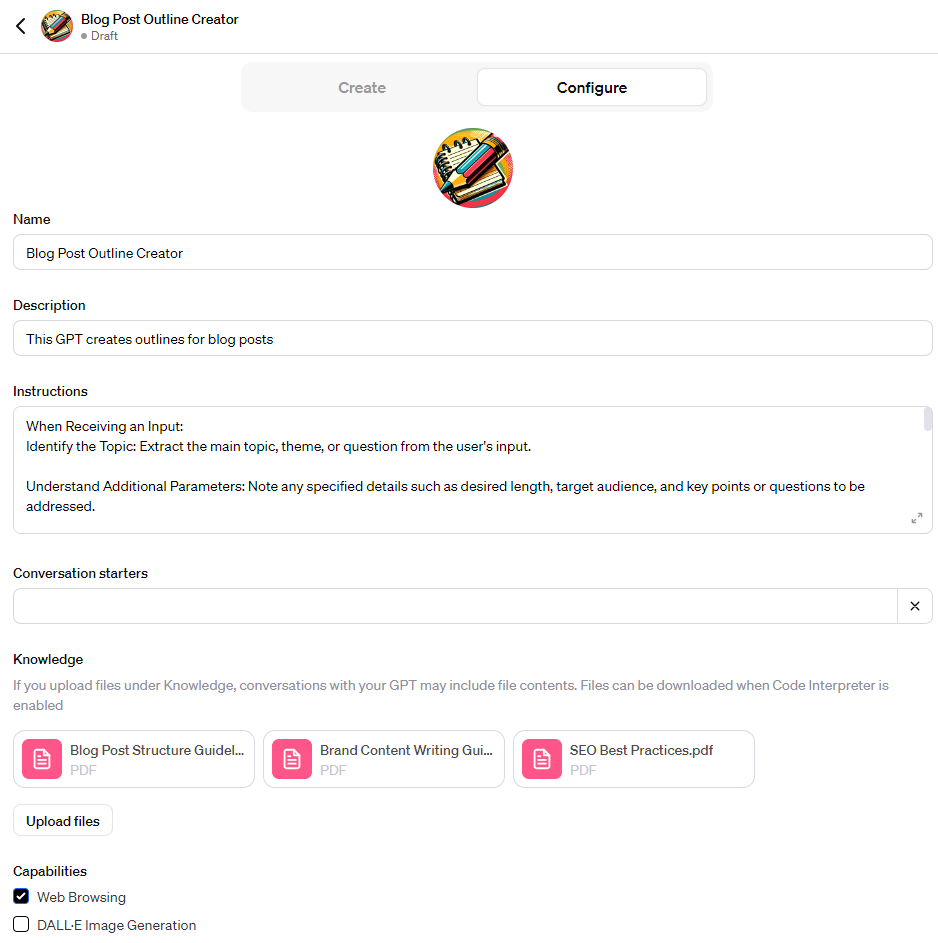
See below for an expanded view of the specific instructions that are provided to the GPT:
Now that you have configured the GPT, you can test it in the “Preview” section. Have some back and forth with it to ensure it’s producing outputs that resonate with your vision. Once satisfied with the outputs, click “Save” in the top right corner.
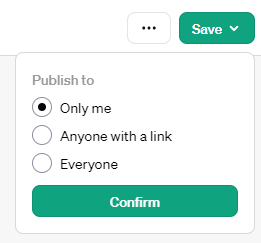
Also, don’t forget that if you’ve included information that you want to keep secure and private in your GPT’s knowledge base, then you should only publish for yourself; otherwise, people have the potential to access that information.
Prompt Engineering for Custom GPTs
Now that we’ve gone through the basics of configuring your custom GPT let’s talk about how to talk to your GPT.
Often, people new to ChatGPT and who don’t understand the nuances of prompting will conclude that ChatGPT can’t help them with their tasks. Usually, this comes down to a lack of knowledge on how to prompt. This same idea applies to custom GPTs.
Prompt engineering might sound complicated, but it’s actually very straightforward; it’s just the process of prompting AI in the most efficient way to get the best outputs possible.
- Bad prompt example: Create an outline for my blog post about how Magikarp evolves into Gyarados.
- Good prompt example: Reference the knowledge base for information about how Magikarp evolves into Gyarados. Reference the writing structure best practices document in the knowledge base on the best way to structure the content for blog posts. Reference the brand writing tone of voice and guidelines for my company that’s in the knowledge base. Now, create a comprehensive outline for a blog post on how Magikarp evolves into Gyarados. The outline should have sections for how Magikarp evolves into Gyarados in the Pokemon show, in the various Pokemon video games, and what Chinese legend Magikarp and Gyarados are inspired by. You should also provide one to two high-level bullet points under each section to help inspire the writing process as to some key points that I should include in that section of the blog post. Following the SEO best practices document in the knowledge base, you will also need to incorporate the following keywords into the outline (either in the headings or the high-level bullet points) so I can ensure that my blog post is optimized for SEO: how does Magikarp evolve, how does Magikarp evolve into Gyarados, how does Magikarp evolve in alpha sapphire, how does Magikarp evolve in brilliant diamond, how does Magikarp evolve in emerald, how does Magikarp evolve in fire red.
The bad prompt example might give you a passable output, but probably not. The good prompt example will get you a far better response from the AI, requiring less editing so that you can dive right into the writing process.
Sometimes, even with a well-thought-out prompt, you might not get an output that you’re 100% satisfied with, and it’s okay if you find yourself in this situation. All you need to do is explain to the GPT exactly what is wrong with the output and what specific changes you’re looking for and ask it to provide another iteration of the output. If there are aspects of the output you liked, be sure to reference that in your follow-up prompt and ask the GPT to keep those elements you liked.
Using the good prompt example, I received the following output from the Blog Post Outline Creator GPT:
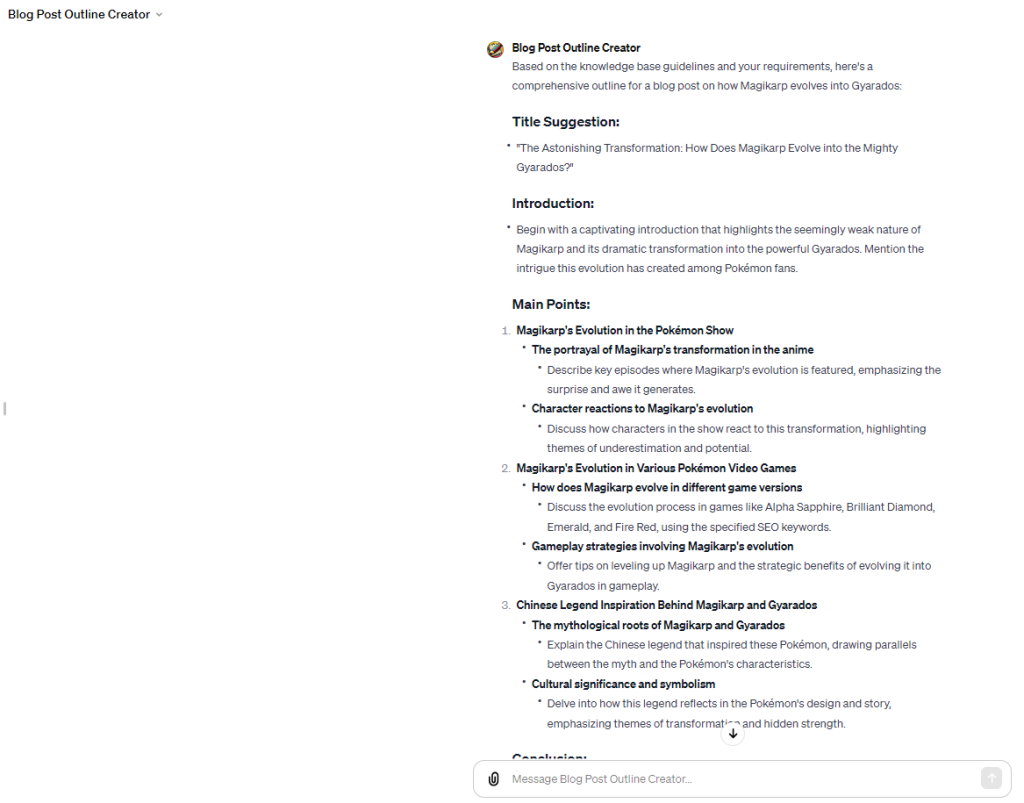
Overall, I’m pretty satisfied with this output, and I know that it will help me dive into my writing process about Magikarp and Gyarados more quickly.
Advanced Features and Real-World Integration
Custom GPTs are relatively easy to create, but if you want to get a little more advanced with them, that’s also an option. If you look at the bottom left-hand corner in the “Configure” section, you’ll see a button that says “Create new action”.
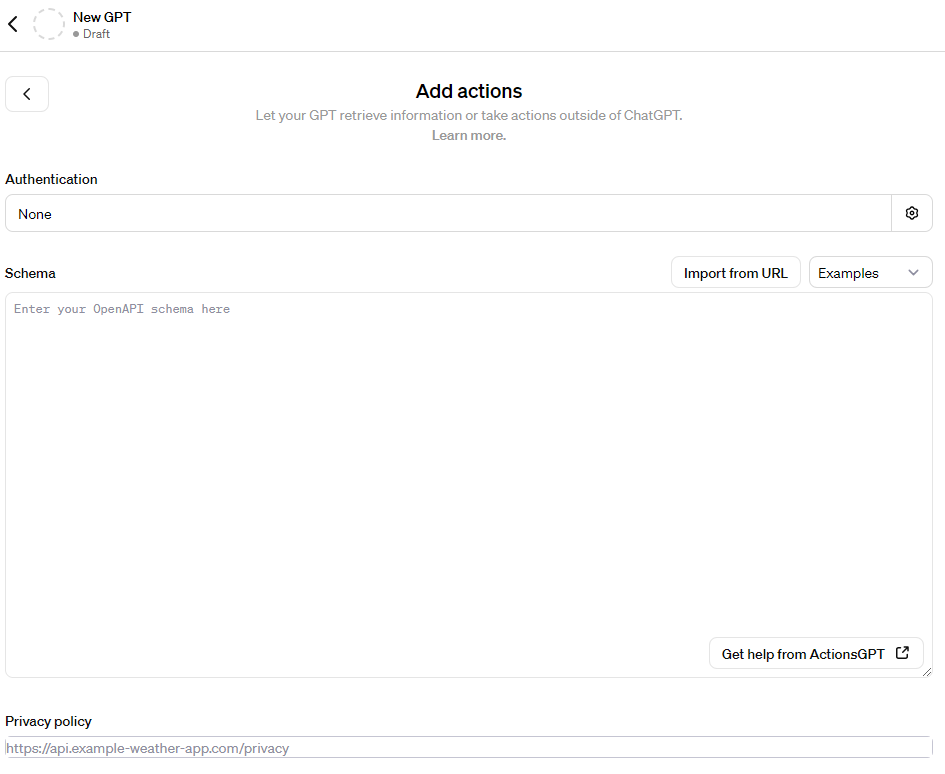
As explained by Open AI, “Actions allow GPTs to integrate external data or interact with the real world, such as connecting GPTs to databases, plugging them into your emails, or making them your shopping assistant, all through APIs.”
If you are tech-savvy and know a thing or two about APIs, the world of custom GPTs becomes much richer. How to best utilize actions is another blog post in and of itself, but I wanted to mention them here to bring them to your awareness.
The Future of Custom GPTs
Custom GPTs are in their infancy, but their power is undeniable. We are at the forefront of this new technology, and over the course of 2024, we’ll start to see how it unfolds, evolves, and transforms the way people work and conduct business operations.
The future of AI is unpredictable, which makes the future of custom GPTs unknown. One thing is for sure: if you’re not experimenting and using this new technology now, you are missing out on the potential to improve the quality and efficiency of your work. Take the time to consider what all use cases for you or your company could be, and start building some GPTs.

